Getting Agones and Minecraft to Play Along!

BORK!
That means hello in Blue Dog!
Progress has been made! Knowledge has been earned! Pain and suffering has been managed! I've managed to get Agones working in a local environment using Minecraft!
I have to admit it was kind of tough. But as I practiced and debugged, more and more started to make sense. But it didn't all go according to plan, in fact there are steps I took that I had to back track on.
To help break it down I'll talk about my process in the following sections: cluster bring up and actually getting Minecraft to work.
Resources I Used
Before I begin, I wanted to give credit to some of the webpages and help articles that helped me along the way.
- Agones Documentation: https://agones.dev/site/docs/overview/
- agones-mc: https://github.com/saulmaldonado/agones-mc
- minikube: https://minikube.sigs.k8s.io/docs/start/
- k0s: https://docs.k0sproject.io/v1.23.8+k0s.0/install/
Note: This article is not a tutorial. The references you see to using minikube and k0s are not recommendations, but rather just tools I used to get the job done.
Setting Up My First Cluster
Setting up the cluster for the first time was actually super simple. The guide on the Agones website makes this super easy: https://agones.dev/site/docs/installation/. Personally, I chose the minikube route, but that gave me complications.
To begin with, I'm currently developing on a Windows 10 machine using WSL2. So running minikube was very easy using the docker driver.
minikube --driver=docker start
This would spin up all the necessary pieces to finish the setup process provided by the Agones installation guide. From here, I could just download the provided install.yaml and gameserver.yaml to get the simple-game-server to work.
Using their verification step, I can run the following and get results!
kamori@wsl2:~/bluedogs-servers# kubectl get gs
NAME                       STATE   ADDRESS         PORT   NODE       AGE
simple-game-server-gg52x   Ready   192.168.94.2    7914   wsl2       24m
I thought I was making excellent time! But then it came time to test my server using netcat. The docs say you can run the following
nc -u 192.168.94.2 7914
And the guide was expecting it to work. The behavior would be the script not ending, and waiting for user input to proceed.
So you could type something like hello world! in, and the server should respond to that with an ACK: hello world!.
Here is what that complete example should look like.
nc -u 192.168.94.2 7914
Hello World!
ACK: Hello World!
^C
Unfortunately, with minikube, that doesn't work. See simple-game-server runs over UDP. However, minikube doesn't support a UDP loadbalancer currently. See: https://github.com/kubernetes/minikube/issues/12362
Minecraft itself runs over TCP. But to me, I wanted a fully working test environment to ensure I don't code myself into a corner later.
Goodbye WSL2 k8s + docker! As much as I'd like to continue to work with you, I might have reached the limit of what our environments can do together.
Setting up my Second Cluster!
Well the minikube cluster I created was a bust. Time for a 2nd cluster. This time, I was going to spin it up on my existing Linux server that is hosting games. Luckily I configured it in a way that the work I'm about to test, that it won't interfere with my running servers.
I needed to spin up a cluster, and I still wanted it to be fast. And I didn't want to use minikube with the docker driver again. I attempted to use Rancher and k3s, but ultimately it took me longer to get started than I had the patience for. So I fell back to another k8s project that turned kubernetes into a single binary. k0s: https://k0sproject.io/
Using their single-node install process was quick and easy. I followed this guide: https://docs.k0sproject.io/v1.23.6+k0s.2/install/ and then in less than a few minutes, I could hit the k8s API without issue.
Moving back to Agones! Lets do all those installation steps again. Apply the install.yaml again, let the controllers and allocators spin up. Then apply the gameserver.yaml
Now I get to be right back where I was!
kamori@bluedogs-linux-server:~/bluedogs-servers# kubectl get gs
NAME                       STATE   ADDRESS         PORT   NODE                         AGE
simple-game-server-lvm2x   Ready   1.1.1.1         7936   bluedogs-linux-server       24m
Now from my local machine, I can use wsl2 ubuntu to test remote connections to my server.
nc -u 1.1.1.1 7936
Hello World please work!
ACK: Hello World please work!
^C
Great success!!!! I can connect to the server! Time to cleanup and move on to getting minecraft up and running.
Running Minecraft in Agones
I figured this part would be easy, now that I have a working UDP game server. Not to say it was hard, but I definitely expected it to "just work" more than it actually did. I started with the following:
First I created my minecraft gameserver object. Here is what I began with.
cat << EOF > minecraft-gameserver.yaml
apiVersion: "agones.dev/v1"
kind: GameServer
metadata:
  generateName: "minecraft-java-"
spec:
  ports:
    - name: minecraft-default
      container: minecraft-java
      portPolicy: Dynamic
      containerPort: 25565
  template:
    spec:
      containers:
      - name: minecraft-java
        image: itzg/minecraft-server:latest
        env:
          - name: EULA
            value: 'TRUE'
          - name: TYPE
            value: SPIGOT
          - name: MEMORY
            value: 2G
EOF
I was then able to run the following to create the game object
sudo k0s kubectl create -f minecraft-gameserver.yaml
And then see the following:
sudo k0s kubectl get gs
minecraft-java-gr75v   Scheduled   1.1.1.1   7073   bluedogs-linux-server   5s
So far so good! Until a little while later, I check it again.
sudo k0s kubectl get gs
minecraft-java-gr75v   Unhealthy   1.1.1.1   7073   bluedogs-linux-server   3m22s
Well what the heck, why is it failing now? Lets do some debugging.
sudo k0s kubectl logs minecraft-java-gr75v -c agones-gameserver-sidecar
{"grpcEndpoint":"localhost:9357","message":"Starting SDKServer grpc service...","severity":"info","source":"main","time":"2022-06-25T16:52:45.621354559Z"}
{"gsKey":"default/minecraft-java-gr75v","message":"Starting workers...","queue":"agones.dev.default.minecraft-java-gr75v","severity":"info","source":"*sdkserver.SDKServer","time":"2022-06-25T16:52:45.719238157Z","workers":1}
{"httpEndpoint":"localhost:9358","message":"Starting SDKServer grpc-gateway...","severity":"info","source":"main","time":"2022-06-25T16:52:46.621594391Z"}
{"failureCount":1,"gsKey":"default/minecraft-java-gr75v","message":"GameServer Health Check failed","severity":"warning","source":"*sdkserver.SDKServer","time":"2022-06-25T16:54:57.725959945Z"}
{"failureCount":2,"gsKey":"default/minecraft-java-gr75v","message":"GameServer Health Check failed","severity":"warning","source":"*sdkserver.SDKServer","time":"2022-06-25T16:55:09.726250183Z"}
{"failureCount":3,"gsKey":"default/minecraft-java-gr75v","message":"GameServer Health Check failed","severity":"warning","source":"*sdkserver.SDKServer","time":"2022-06-25T16:55:21.726461886Z"}
{"failureCount":4,"gsKey":"default/minecraft-java-gr75v","message":"GameServer Health Check failed","severity":"warning","source":"*sdkserver.SDKServer","time":"2022-06-25T16:55:33.731390356Z"}
{"failureCount":5,"gsKey":"default/minecraft-java-gr75v","message":"GameServer Health Check failed","severity":"warning","source":"*sdkserver.SDKServer","time":"2022-06-25T16:55:45.739470665Z"}
{"gameServerName":"minecraft-java-gr75v","gsKey":"default/minecraft-java-gr75v","message":"GameServer has failed health check","severity":"warning","source":"*sdkserver.SDKServer","time":"2022-06-25T16:55:45.739589198Z"}
{"failureCount":6,"gsKey":"default/minecraft-java-gr75v","message":"GameServer Health Check failed","severity":"warning","source":"*sdkserver.SDKServer","time":"2022-06-25T16:55:57.740600931Z"}
{"gameServerName":"minecraft-java-gr75v","gsKey":"default/minecraft-java-gr75v","message":"GameServer has failed health check","severity":"warning","source":"*sdkserver.SDKServer","time":"2022-06-25T16:55:57.740656864Z"}
{"failureCount":7,"gsKey":"default/minecraft-java-gr75v","message":"GameServer Health Check failed","severity":"warning","source":"*sdkserver.SDKServer","time":"2022-06-25T16:56:09.741670318Z"}
{"gameServerName":"minecraft-java-gr75v","gsKey":"default/minecraft-java-gr75v","message":"GameServer has failed health check","severity":"warning","source":"*sdkserver.SDKServer","time":"2022-06-25T16:56:09.741753229Z"}
{"failureCount":8,"gsKey":"default/minecraft-java-gr75v","message":"GameServer Health Check failed","severity":"warning","source":"*sdkserver.SDKServer","time":"2022-06-25T16:56:21.742824123Z"}
{"gameServerName":"minecraft-java-gr75v","gsKey":"default/minecraft-java-gr75v","message":"GameServer has failed health check","severity":"warning","source":"*sdkserver.SDKServer","time":"2022-06-25T16:56:21.742902366Z"}
{"failureCount":9,"gsKey":"default/minecraft-java-gr75v","message":"GameServer Health Check failed","severity":"warning","source":"*sdkserver.SDKServer","time":"2022-06-25T16:56:33.744044178Z"}
{"gameServerName":"minecraft-java-gr75v","gsKey":"default/minecraft-java-gr75v","message":"GameServer has failed health check","severity":"warning","source":"*sdkserver.SDKServer","time":"2022-06-25T16:56:33.744122815Z"}
{"failureCount":10,"gsKey":"default/minecraft-java-gr75v","message":"GameServer Health Check failed","severity":"warning","source":"*sdkserver.SDKServer","time":"2022-06-25T16:56:45.744308106Z"}
{"gameServerName":"minecraft-java-gr75v","gsKey":"default/minecraft-java-gr75v","message":"GameServer has failed health check","severity":"warning","source":"*sdkserver.SDKServer","time":"2022-06-25T16:56:45.744677123Z"}
We are failing all the sdk server health checks. But these are needed to actually set the server to Ready(), otherwise it will just fail. https://agones.dev/site/docs/guides/client-sdks/
I was a little demotivated, because I didn't want to have to write a whole wrapper just to have a prototype. Luckily, I found the following project: https://github.com/saulmaldonado/agones-mc. In that project, the author has a monitor already created that we can use to talk to the SDK and mark it as healthy and ready.
The image name: saulmaldonado/agones-mc
So we can go ahead and update our minecraft gameserver, using the agones-mc repo as a guide. And use the example monitor provided to see what we can get.
cat << EOF > minecraft-gameserver.yaml
apiVersion: "agones.dev/v1"
kind: GameServer
metadata:
  generateName: "minecraft-java-"
spec:
  ports:
    - name: minecraft-default
      container: minecraft-java
      portPolicy: Dynamic
      containerPort: 25565
  template:
    spec:
      containers:
      - name: minecraft-java
        image: itzg/minecraft-server:latest
        env:
          - name: EULA
            value: 'TRUE'
          - name: TYPE
            value: SPIGOT
          - name: MEMORY
            value: 2G
      - name: minecraft-monitor
        image: saulmaldonado/agones-mc # monitor
        args:
          - monitor
        env:
          - name: INITIAL_DELAY
            value: 30s
          - name: MAX_ATTEMPTS
            value: "5"
          - name: INTERVAL
            value: 10s
          - name: TIMEOUT
            value: 10s
        imagePullPolicy: Always
EOF
Cleanup our old gameserver
sudo k0s kubectl delete gs --all
Run this again:
sudo k0s kubectl create -f minecraft-gameserver.yaml
And then monitor our results:
sudo k0s kubectl get gs -w
minecraft-java-tz8kw   Scheduled   1.1.1.1   7656   bluedogs-linux-server   5s
And if we wait a bit of time we'll see the status on that gameserver update to the value we need!
sudo k0s kubectl get gs -w
minecraft-java-tz8kw   Ready   1.1.1.1   7656   bluedogs-linux-server   2m29s
So lets connect using the Minecraft client and 1.1.1.1:7656

Unfortunately, no such luck.
After lots of digging and troubleshooting. I finally found the error. Remember how I said Minecraft runs on TCP. Well Agones defaults ports to UDP. So lets update the gameserver yaml, and try it all again!
cat << EOF > minecraft-gameserver.yaml
apiVersion: "agones.dev/v1"
kind: GameServer
metadata:
  generateName: "minecraft-java-"
spec:
  container: minecraft-java # Set this to tell the server which container is the gameserver
  ports:
    - name: minecraft-default
      container: minecraft-java
      portPolicy: Dynamic
      containerPort: 25565
      protocol: TCP
  template:
    spec:
      containers:
      - name: minecraft-java
        image: itzg/minecraft-server:latest
        env:
          - name: EULA
            value: 'TRUE'
          - name: TYPE
            value: SPIGOT
          - name: MEMORY
            value: 2G

      - name: minecraft-monitor
        image: saulmaldonado/agones-mc # monitor
        args:
          - monitor
        env:
          - name: INITIAL_DELAY
            value: 30s
          - name: MAX_ATTEMPTS
            value: "5"
          - name: INTERVAL
            value: 10s
          - name: TIMEOUT
            value: 10s
        imagePullPolicy: Always
EOF
Cleanup our old gameserver
sudo k0s kubectl delete gs --all
Run this again:
sudo k0s kubectl create -f minecraft-gameserver.yaml
And then monitor our results until we see Ready:
sudo k0s kubectl get gs -w
minecraft-java-mnlkn   Scheduled   1.1.1.1   7108   bluedogs-linux-server   5s
minecraft-java-mnlkn   Ready   1.1.1.1   7108   bluedogs-linux-server   2m31s
Now lets try to connect again, remembering to update our port in the Minecraft client.

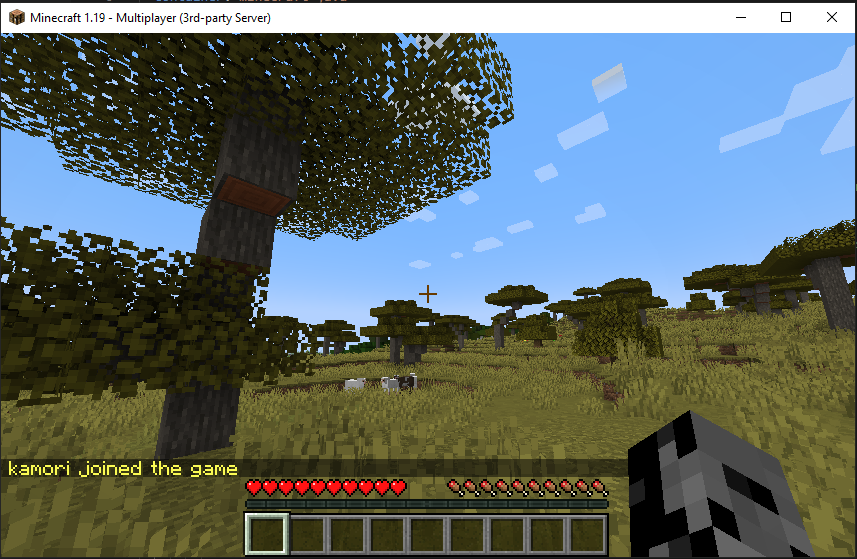
Looking good! Now to actually connect.

WOOHOO WE DID IT! Time for celebratory air horns! https://www.youtube.com/watch?v=OFr74zI1LBM
Conclusion
We did it. We freakin' did it! We still have a long way to go, but we now officially have a prototyped Minecraft server that we can manage with Agones. If we really wanted to, we could call this an MVP. We could spin up servers for people by hand, and just monitor them manually.
The downside is there is no management to ensure the server comes back online if it fails. Nor anything to ensure there is persistent storage so we play on the same server every time. Additionally, 2 servers can't be run on Minecraft port 25565 using the current method of deployment. So each server would require a small level of modification. Overall, I don't like that, so I'd rather expand on the idea and build at least a bit more function before I continue.
While that is it for now. In my next update, I hope to be able to run multiple Minecraft servers persistently. Make sure to subscribe to learn more! And wish me luck!